해보면서 느낀 리액트 성능 최적화에 대한 고찰
이 글을 통해 전하고 싶은 메세지
- 리액트 개발자 도구를 잘 쓰는 게 굉장히 중요하다.
useCallback,useMemo,React.memo를 사용하면 리액트 렌더링에 있어서 최적화를 할 수 있다.- 단, 이것들을 사용할 때에는 언제 사용해야 하는지에 대한 판단이 중요하다.
- 정말, 정말로 언제 사용해야 하는 지에 대한 판단이 굉장히 중요하다.
- 잘못 사용하면 오히려 성능을 저하시킬 수 있기 때문이다.
글을 쓰게된 계기
나는 좋은 개발자인가?
프론트앤드 개발자이면서 사용자를 고려하고 있는건가?
프론트앤드 개발로 전향한지 거진 1년이 되어간다. 부스트캠프 등을 거치면서 많이 배웠다고 생각했었다.
2024년 회고를 진행하면서 스스로를 돌아보니, '구현'에 급급했지, 그 이상의 것을 고려하고 있었다.
어느정도 구현을 할 수 있게 된 지금, 리액트의 원리 탐구를 넘어서 사용자에게 가치를 전달하는 관점에서 접근할 필요가 있었다.
항해플러스 프론트앤드 4기
앞선 이유와 더불어서, 실무적으로 깊은 성장을 하기 위해 항해플러스를 신청했다.
항해플러스에서는 프론트엔드 개발자로서 성장하기 위한 다양한 과정을 제공하고 있다.
처음에는 리액트와 자바스크립트에 대해서 깊게 다루는데, 그 과정에서 리팩토링과 성능 최적화를 경험할 수 있는 상황을 만나게 되었다.
이번 기회에 제대로 한번 몸으로 느껴보면서 성능 최적화에 대한 말말말에 대해 나만의 말을 만들어보자는 생각에 글을 적게 되었다.
문제 상황
코드 상황 (350줄 가까이 되는 코드, 스크롤 많아짐 주의)
import React, { useState, createContext, useContext } from "react";
import { generateItems, renderLog } from "./utils";

// 타입 정의
interface Item {
  id: number;
  name: string;
  category: string;
  price: number;
}

interface User {
  id: number;
  name: string;
  email: string;
}

interface Notification {
  id: number;
  message: string;
  type: "info" | "success" | "warning" | "error";
}

// AppContext 타입 정의
interface AppContextType {
  theme: string;
  toggleTheme: () => void;
  user: User | null;
  login: (email: string, password: string) => void;
  logout: () => void;
  notifications: Notification[];
  addNotification: (message: string, type: Notification["type"]) => void;
  removeNotification: (id: number) => void;
}

const AppContext = createContext<AppContextType | undefined>(undefined);

// 커스텀 훅: useAppContext
const useAppContext = () => {
  const context = useContext(AppContext);
  if (context === undefined) {
    throw new Error("useAppContext must be used within an AppProvider");
  }
  return context;
};

// Header 컴포넌트
export const Header: React.FC = () => {
  renderLog("Header rendered");
  const { theme, toggleTheme, user, login, logout } = useAppContext();

  const handleLogin = () => {
    // 실제 애플리케이션에서는 사용자 입력을 받아야 합니다.
    login("user@example.com", "password");
  };

  return (
    <header className="bg-gray-800 text-white p-4">
      <div className="container mx-auto flex justify-between items-center">
        <h1 className="text-2xl font-bold">샘플 애플리케이션</h1>
        <div className="flex items-center">
          <button
            onClick={toggleTheme}
            className="bg-blue-500 hover:bg-blue-700 text-white font-bold py-2 px-4 rounded mr-2"
          >
            {theme === "light" ? "다크 모드" : "라이트 모드"}
          </button>
          {user ? (
            <div className="flex items-center">
              <span className="mr-2">{user.name}님 환영합니다!</span>
              <button
                onClick={logout}
                className="bg-red-500 hover:bg-red-700 text-white font-bold py-2 px-4 rounded"
              >
                로그아웃
              </button>
            </div>
          ) : (
            <button
              onClick={handleLogin}
              className="bg-green-500 hover:bg-green-700 text-white font-bold py-2 px-4 rounded"
            >
              로그인
            </button>
          )}
        </div>
      </div>
    </header>
  );
};

// ItemList 컴포넌트
export const ItemList: React.FC<{
  items: Item[];
  onAddItemsClick: () => void;
}> = ({ items, onAddItemsClick }) => {
  renderLog("ItemList rendered");
  const [filter, setFilter] = useState("");
  const { theme } = useAppContext();

  const filteredItems = items.filter(
    (item) =>
      item.name.toLowerCase().includes(filter.toLowerCase()) ||
      item.category.toLowerCase().includes(filter.toLowerCase())
  );

  const totalPrice = filteredItems.reduce((sum, item) => sum + item.price, 0);

  const averagePrice = Math.round(totalPrice / filteredItems.length) || 0;

  return (
    <div className="mt-8">
      <div className="flex justify-between items-center mb-4">
        <h2 className="text-2xl font-bold">상품 목록</h2>
        <div>
          <button
            type="button"
            className="bg-blue-500 hover:bg-blue-700 text-white font-bold py-2 px-4 rounded text-xs"
            onClick={onAddItemsClick}
          >
            대량추가
          </button>
        </div>
      </div>
      <input
        type="text"
        placeholder="상품 검색..."
        value={filter}
        onChange={(e) => setFilter(e.target.value)}
        className="w-full p-2 mb-4 border border-gray-300 rounded text-black"
      />
      <ul className="mb-4 mx-4 flex gap-3 text-sm justify-end">
        <li>검색결과: {filteredItems.length.toLocaleString()}개</li>
        <li>전체가격: {totalPrice.toLocaleString()}원</li>
        <li>평균가격: {averagePrice.toLocaleString()}원</li>
      </ul>
      <ul className="space-y-2">
        {filteredItems.map((item, index) => (
          <li
            key={index}
            className={`p-2 rounded shadow ${
              theme === "light"
                ? "bg-white text-black"
                : "bg-gray-700 text-white"
            }`}
          >
            {item.name} - {item.category} - {item.price.toLocaleString()}원
          </li>
        ))}
      </ul>
    </div>
  );
};

// ComplexForm 컴포넌트
export const ComplexForm: React.FC = () => {
  renderLog("ComplexForm rendered");
  const { addNotification } = useAppContext();
  const [formData, setFormData] = useState({
    name: "",
    email: "",
    age: 0,
    preferences: [] as string[],
  });

  const handleSubmit = (e: React.FormEvent) => {
    e.preventDefault();
    addNotification("폼이 성공적으로 제출되었습니다", "success");
  };

  const handleInputChange = (e: React.ChangeEvent<HTMLInputElement>) => {
    const { name, value } = e.target;
    setFormData((prev) => ({
      ...prev,
      [name]: name === "age" ? parseInt(value) || 0 : value,
    }));
  };

  const handlePreferenceChange = (preference: string) => {
    setFormData((prev) => ({
      ...prev,
      preferences: prev.preferences.includes(preference)
        ? prev.preferences.filter((p) => p !== preference)
        : [...prev.preferences, preference],
    }));
  };

  return (
    <div className="mt-8">
      <h2 className="text-2xl font-bold mb-4">복잡한 폼</h2>
      <form onSubmit={handleSubmit} className="space-y-4">
        <input
          type="text"
          name="name"
          value={formData.name}
          onChange={handleInputChange}
          placeholder="이름"
          className="w-full p-2 border border-gray-300 rounded text-black"
        />
        <input
          type="email"
          name="email"
          value={formData.email}
          onChange={handleInputChange}
          placeholder="이메일"
          className="w-full p-2 border border-gray-300 rounded text-black"
        />
        <input
          type="number"
          name="age"
          value={formData.age}
          onChange={handleInputChange}
          placeholder="나이"
          className="w-full p-2 border border-gray-300 rounded text-black"
        />
        <div className="space-x-4">
          {["독서", "운동", "음악", "여행"].map((pref) => (
            <label key={pref} className="inline-flex items-center">
              <input
                type="checkbox"
                checked={formData.preferences.includes(pref)}
                onChange={() => handlePreferenceChange(pref)}
                className="form-checkbox h-5 w-5 text-blue-600"
              />
              <span className="ml-2">{pref}</span>
            </label>
          ))}
        </div>
        <button
          type="submit"
          className="bg-blue-500 hover:bg-blue-700 text-white font-bold py-2 px-4 rounded"
        >
          제출
        </button>
      </form>
    </div>
  );
};

// NotificationSystem 컴포넌트
export const NotificationSystem: React.FC = () => {
  renderLog("NotificationSystem rendered");
  const { notifications, removeNotification } = useAppContext();

  return (
    <div className="fixed bottom-4 right-4 space-y-2">
      {notifications.map((notification) => (
        <div
          key={notification.id}
          className={`p-4 rounded shadow-lg ${
            notification.type === "success"
              ? "bg-green-500"
              : notification.type === "error"
              ? "bg-red-500"
              : notification.type === "warning"
              ? "bg-yellow-500"
              : "bg-blue-500"
          } text-white`}
        >
          {notification.message}
          <button
            onClick={() => removeNotification(notification.id)}
            className="ml-4 text-white hover:text-gray-200"
          >
            닫기
          </button>
        </div>
      ))}
    </div>
  );
};

// 메인 App 컴포넌트
const App: React.FC = () => {
  const [theme, setTheme] = useState("light");
  const [items, setItems] = useState(generateItems(1000));
  const [user, setUser] = useState<User | null>(null);
  const [notifications, setNotifications] = useState<Notification[]>([]);

  const toggleTheme = () => {
    setTheme((prevTheme) => (prevTheme === "light" ? "dark" : "light"));
  };

  const addItems = () => {
    setItems((prevItems) => [
      ...prevItems,
      ...generateItems(1000, prevItems.length),
    ]);
  };

  const login = (email: string) => {
    setUser({ id: 1, name: "홍길동", email });
    addNotification("성공적으로 로그인되었습니다", "success");
  };

  const logout = () => {
    setUser(null);
    addNotification("로그아웃되었습니다", "info");
  };

  const addNotification = (message: string, type: Notification["type"]) => {
    const newNotification: Notification = {
      id: Date.now(),
      message,
      type,
    };
    setNotifications((prev) => [...prev, newNotification]);
  };

  const removeNotification = (id: number) => {
    setNotifications((prev) =>
      prev.filter((notification) => notification.id !== id)
    );
  };

  const contextValue: AppContextType = {
    theme,
    toggleTheme,
    user,
    login,
    logout,
    notifications,
    addNotification,
    removeNotification,
  };

  return (
    <AppContext.Provider value={contextValue}>
      <div
        className={`min-h-screen ${
          theme === "light" ? "bg-gray-100" : "bg-gray-900 text-white"
        }`}
      >
        <Header />
        <div className="container mx-auto px-4 py-8">
          <div className="flex flex-col md:flex-row">
            <div className="w-full md:w-1/2 md:pr-4">
              <ItemList items={items} onAddItemsClick={addItems} />
            </div>
            <div className="w-full md:w-1/2 md:pl-4">
              <ComplexForm />
            </div>
          </div>
        </div>
        <NotificationSystem />
      </div>
    </AppContext.Provider>
  );
};

export default App;
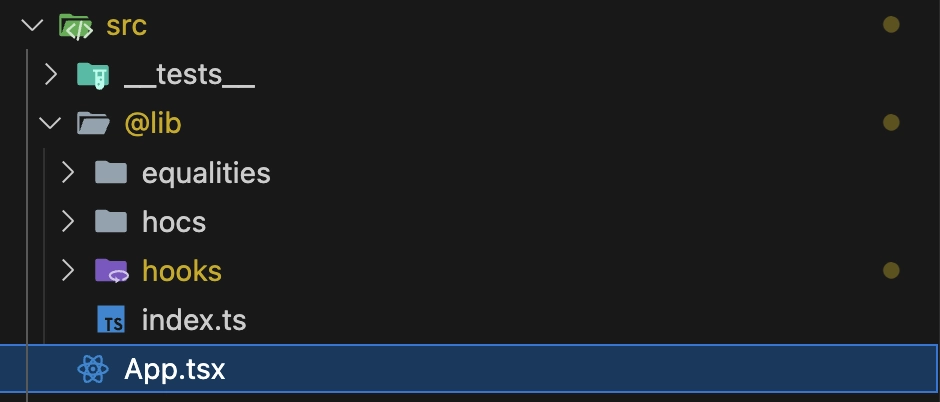
처음에 주어진 코드와 디렉토리 구조이다.
내가 처리한 로직에 대해서는 내가 항해플러스 과제를 수행한 깃허브에서 확인할 수 있다.
현재 코드 구조
현재 코드의 구조를 정리하면 다음과 같다.
- 전체 도식도
- 컴포넌트 구조
- 전역 상태
- 커스텀 훅
- AppContext
- theme
- toggleTheme
- user
- login
- logout
- notifications
- addNotification
- removeNotification
- useAppContext
이미 커스텀 훅 하나를 포함하고 있다. 그리고, 코드 내부에도 여러가지 훅 요소가 많이 존재하고 있다.
최적화를 위한 발상
현재 코드에서 내가 접근해볼 최적화는 2가지이다.
- 코드를 모듈화 시키기
- 관련된 로직 최적화하기
최적화는 useMemo, useCallback, React.memo 등을 사용해서 컴포넌트를 최적화하는 방법을 생각해보고자 한다.
코드의 모듈화
코드를 최적화 하기 전에, 가독성을 높힐 필요가 있다.
타입 선언의 분리
현재 코드에서는 타입 선언이 컴포넌트 코드와 섞여있다.
타입의 경우, 컴포넌트와 context 모두에서 쓰이다보니 외부로 분리할 필요가 있었다.
이번 프로젝트에 대해서만 리팩토링을 진행하고, 프로젝트 내의 모든 컴포넌트에서 사용하니, src에 types라는 폴더를 만들고 types.ts 로 명명하고 분리하였다.
- 디렉토리 사진
- types.ts

// 타입 정의
export interface Item {
  id: number;
  name: string;
  category: string;
  price: number;
}

export interface User {
  id: number;
  name: string;
  email: string;
}

export interface Notification {
  id: number;
  message: string;
  type: "info" | "success" | "warning" | "error";
}

// AppContext 타입 정의
export interface AppContextType {
  theme: string;
  toggleTheme: () => void;
  user: User | null;
  login: (email: string, password: string) => void;
  logout: () => void;
  notifications: Notification[];
  addNotification: (message: string, type: Notification["type"]) => void;
  removeNotification: (id: number) => void;
}
훅의 분리
현재 코드에서는 useAppContext라는 커스텀 훅이 존재한다.
이 훅은, Header 등의 컴포넌트에서 공통으로 사용되고 있다.
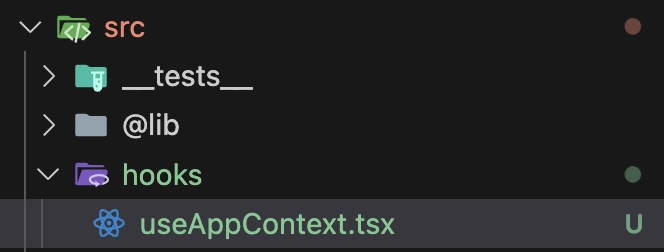
이에 따라서 src에 hooks 폴더를 만들고 useAppContext.ts로 분리하였다.
- 디렉토리 사진
- useAppContext.ts
import { createContext, useContext } from "react";
import type { AppContextType } from "../types/types";

export const AppContext = createContext<AppContextType | undefined>(undefined);

// 커스텀 훅: useAppContext
export const useAppContext = () => {
  const context = useContext(AppContext);
  if (context === undefined) {
    throw new Error("useAppContext must be used within an AppProvider");
  }
  return context;
};
컴포넌트의 분리
App.tsx 코드를 보면 Header, ItemList, ComplexForm, NotificationSystem이 모두 App 컴포넌트 내부에 존재한다.
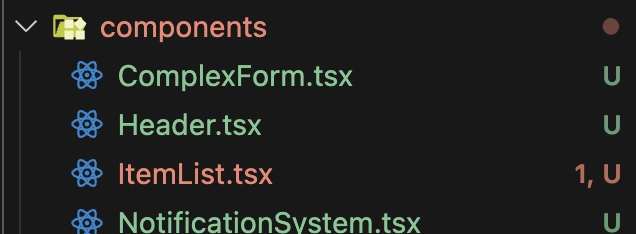
이를 분리하기 위해서 components 폴더를 만들고, Header.tsx, ItemList.tsx, ComplexForm.tsx, NotificationSystem.tsx로 분리하였다.
- 디렉토리 사진
- Header.tsx
- ComplexForm.tsx
- ItemList.tsx
- NotificationSystem.tsx
- App.tsx
import { renderLog } from "../utils";
import { useAppContext } from "../hooks/useAppContext";

// Header 컴포넌트
export const Header: React.FC = () => {
  renderLog("Header rendered");
  const { theme, toggleTheme, user, login, logout } = useAppContext();

  const handleLogin = () => {
    // 실제 애플리케이션에서는 사용자 입력을 받아야 합니다.
    login("user@example.com", "password");
  };

  return (
    <header className="bg-gray-800 text-white p-4">
      <div className="container mx-auto flex justify-between items-center">
        <h1 className="text-2xl font-bold">샘플 애플리케이션</h1>
        <div className="flex items-center">
          <button
            onClick={toggleTheme}
            className="bg-blue-500 hover:bg-blue-700 text-white font-bold py-2 px-4 rounded mr-2"
          >
            {theme === "light" ? "다크 모드" : "라이트 모드"}
          </button>
          {user ? (
            <div className="flex items-center">
              <span className="mr-2">{user.name}님 환영합니다!</span>
              <button
                onClick={logout}
                className="bg-red-500 hover:bg-red-700 text-white font-bold py-2 px-4 rounded"
              >
                로그아웃
              </button>
            </div>
          ) : (
            <button
              onClick={handleLogin}
              className="bg-green-500 hover:bg-green-700 text-white font-bold py-2 px-4 rounded"
            >
              로그인
            </button>
          )}
        </div>
      </div>
    </header>
  );
};
import { useState } from "react";
import { renderLog } from "../utils";
import { useAppContext } from "../hooks/useAppContext";

// ComplexForm 컴포넌트
export const ComplexForm: React.FC = () => {
  renderLog("ComplexForm rendered");
  const { addNotification } = useAppContext();
  const [formData, setFormData] = useState({
    name: "",
    email: "",
    age: 0,
    preferences: [] as string[],
  });

  const handleSubmit = (e: React.FormEvent) => {
    e.preventDefault();
    addNotification("폼이 성공적으로 제출되었습니다", "success");
  };

  const handleInputChange = (e: React.ChangeEvent<HTMLInputElement>) => {
    const { name, value } = e.target;
    setFormData((prev) => ({
      ...prev,
      [name]: name === "age" ? parseInt(value) || 0 : value,
    }));
  };

  const handlePreferenceChange = (preference: string) => {
    setFormData((prev) => ({
      ...prev,
      preferences: prev.preferences.includes(preference)
        ? prev.preferences.filter((p) => p !== preference)
        : [...prev.preferences, preference],
    }));
  };

  return (
    <div className="mt-8">
      <h2 className="text-2xl font-bold mb-4">복잡한 폼</h2>
      <form onSubmit={handleSubmit} className="space-y-4">
        <input
          type="text"
          name="name"
          value={formData.name}
          onChange={handleInputChange}
          placeholder="이름"
          className="w-full p-2 border border-gray-300 rounded text-black"
        />
        <input
          type="email"
          name="email"
          value={formData.email}
          onChange={handleInputChange}
          placeholder="이메일"
          className="w-full p-2 border border-gray-300 rounded text-black"
        />
        <input
          type="number"
          name="age"
          value={formData.age}
          onChange={handleInputChange}
          placeholder="나이"
          className="w-full p-2 border border-gray-300 rounded text-black"
        />
        <div className="space-x-4">
          {["독서", "운동", "음악", "여행"].map((pref) => (
            <label key={pref} className="inline-flex items-center">
              <input
                type="checkbox"
                checked={formData.preferences.includes(pref)}
                onChange={() => handlePreferenceChange(pref)}
                className="form-checkbox h-5 w-5 text-blue-600"
              />
              <span className="ml-2">{pref}</span>
            </label>
          ))}
        </div>
        <button
          type="submit"
          className="bg-blue-500 hover:bg-blue-700 text-white font-bold py-2 px-4 rounded"
        >
          제출
        </button>
      </form>
    </div>
  );
};
import { useState } from "react";
import { renderLog } from "../utils";
import { useAppContext } from "../hooks/useAppContext";
import { Item } from "../types/types";

// ItemList 컴포넌트
export const ItemList: React.FC<{
  items: Item[];
  onAddItemsClick: () => void;
}> = ({ items, onAddItemsClick }) => {
  renderLog("ItemList rendered");
  const [filter, setFilter] = useState("");
  const { theme } = useAppContext();

  const filteredItems = items.filter(
    (item) =>
      item.name.toLowerCase().includes(filter.toLowerCase()) ||
      item.category.toLowerCase().includes(filter.toLowerCase())
  );

  const totalPrice = filteredItems.reduce((sum, item) => sum + item.price, 0);

  const averagePrice = Math.round(totalPrice / filteredItems.length) || 0;

  return (
    <div className="mt-8">
      <div className="flex justify-between items-center mb-4">
        <h2 className="text-2xl font-bold">상품 목록</h2>
        <div>
          <button
            type="button"
            className="bg-blue-500 hover:bg-blue-700 text-white font-bold py-2 px-4 rounded text-xs"
            onClick={onAddItemsClick}
          >
            대량추가
          </button>
        </div>
      </div>
      <input
        type="text"
        placeholder="상품 검색..."
        value={filter}
        onChange={(e) => setFilter(e.target.value)}
        className="w-full p-2 mb-4 border border-gray-300 rounded text-black"
      />
      <ul className="mb-4 mx-4 flex gap-3 text-sm justify-end">
        <li>검색결과: {filteredItems.length.toLocaleString()}개</li>
        <li>전체가격: {totalPrice.toLocaleString()}원</li>
        <li>평균가격: {averagePrice.toLocaleString()}원</li>
      </ul>
      <ul className="space-y-2">
        {filteredItems.map((item, index) => (
          <li
            key={index}
            className={`p-2 rounded shadow ${
              theme === "light"
                ? "bg-white text-black"
                : "bg-gray-700 text-white"
            }`}
          >
            {item.name} - {item.category} - {item.price.toLocaleString()}원
          </li>
        ))}
      </ul>
    </div>
  );
};
import { renderLog } from "../utils";
import { useAppContext } from "../hooks/useAppContext";

// NotificationSystem 컴포넌트
export const NotificationSystem: React.FC = () => {
  renderLog("NotificationSystem rendered");
  const { notifications, removeNotification } = useAppContext();

  return (
    <div className="fixed bottom-4 right-4 space-y-2">
      {notifications.map((notification) => (
        <div
          key={notification.id}
          className={`p-4 rounded shadow-lg ${
            notification.type === "success"
              ? "bg-green-500"
              : notification.type === "error"
              ? "bg-red-500"
              : notification.type === "warning"
              ? "bg-yellow-500"
              : "bg-blue-500"
          } text-white`}
        >
          {notification.message}
          <button
            onClick={() => removeNotification(notification.id)}
            className="ml-4 text-white hover:text-gray-200"
          >
            닫기
          </button>
        </div>
      ))}
    </div>
  );
};
import React, { useState } from "react";
import { generateItems } from "./utils";
import { AppContext } from "./hooks/useAppContext";
import { User, Notification, AppContextType } from "./types/types";
import { Header } from "./components/Header";
import { ItemList } from "./components/ItemList";
import { ComplexForm } from "./components/ComplexForm";
import { NotificationSystem } from "./components/NotificationSystem";

// 메인 App 컴포넌트
const App: React.FC = () => {
  const [theme, setTheme] = useState("light");
  const [items, setItems] = useState(generateItems(1000));
  const [user, setUser] = useState<User | null>(null);
  const [notifications, setNotifications] = useState<Notification[]>([]);

  const toggleTheme = () => {
    setTheme((prevTheme) => (prevTheme === "light" ? "dark" : "light"));
  };

  const addItems = () => {
    setItems((prevItems) => [
      ...prevItems,
      ...generateItems(1000, prevItems.length),
    ]);
  };

  const login = (email: string) => {
    setUser({ id: 1, name: "홍길동", email });
    addNotification("성공적으로 로그인되었습니다", "success");
  };

  const logout = () => {
    setUser(null);
    addNotification("로그아웃되었습니다", "info");
  };

  const addNotification = (message: string, type: Notification["type"]) => {
    const newNotification: Notification = {
      id: Date.now(),
      message,
      type,
    };
    setNotifications((prev) => [...prev, newNotification]);
  };

  const removeNotification = (id: number) => {
    setNotifications((prev) =>
      prev.filter((notification) => notification.id !== id)
    );
  };

  const contextValue: AppContextType = {
    theme,
    toggleTheme,
    user,
    login,
    logout,
    notifications,
    addNotification,
    removeNotification,
  };

  return (
    <AppContext.Provider value={contextValue}>
      <div
        className={`min-h-screen ${
          theme === "light" ? "bg-gray-100" : "bg-gray-900 text-white"
        }`}
      >
        <Header />
        <div className="container mx-auto px-4 py-8">
          <div className="flex flex-col md:flex-row">
            <div className="w-full md:w-1/2 md:pr-4">
              <ItemList items={items} onAddItemsClick={addItems} />
            </div>
            <div className="w-full md:w-1/2 md:pl-4">
              <ComplexForm />
            </div>
          </div>
        </div>
        <NotificationSystem />
      </div>
    </AppContext.Provider>
  );
};

export default App;
개선할 사항이 남아 있지만, 큼직한 흐름은 분리를 하였다.
Barrel 파일 생성
베럴 파일은 여러 모듈의 export를 단일 import 문을 사용하여 가져올 수 있도록 하는 파일이다.
구조 개선에 앞서서 import, export 구문을 줄이기 위해 index.ts 파일을 만들어서 components, hooks, types 폴더에 추가하였다.
- components 베럴 파일
- hooks 베럴 파일
- types 베럴 파일
export * from "./ComplexForm";
export * from "./Header";
export * from "./ItemList";
export * from "./NotificationSystem";
export * from "./useAppContext";
export * from "./types";
그리고 이에 따라서 import / export 문도 수정해준다.
- App.tsx의 수정 전
- App.tsx의 수정 후
import React, { useState } from "react";
import { generateItems } from "./utils";
import { AppContext } from "./hooks/useAppContext";
import { User, Notification, AppContextType } from "./types/types";
import { Header } from "./components/Header";
import { ItemList } from "./components/ItemList";
import { ComplexForm } from "./components/ComplexForm";
import { NotificationSystem } from "./components/NotificationSystem";
import { generateItems } from "./utils";
import { AppContext } from "./hooks/useAppContext";
import { User, Notification, AppContextType } from "./types";
import {
  Header,
  ItemList,
  ComplexForm,
  NotificationSystem,
} from "./components";
굉장히 깔끔해진 것을 볼 수 있다.
성능 최적화
코드를 1차적으로 모듈화 시켰으니, 이제 이를 기반으로 최적화를 진행한다.
사용할 최적화 방법은 다음과 같다.
useCallback을 사용한 함수의 최적화useMemo를 사용한 값 최적화React.memo를 사용한 컴포넌트 최적화
어떤 기준으로 최적화를 해야하는가?
최적화를 이제 막 배우는 단계로써, 명확하게 기준을 갖고 있지는 않다.
그럼에도, 내가 코드를 바라보았을 때 생각해볼 수 있는 요소는 다음과 같다.
- 불필요한 렌더링 방지
- 렌더링 과정에서 불필요한 리소스 낭비 방지
즉, 렌더링 자체와 렌더링에서 일어나는 일에 대한 최적화를 기준으로 생각해볼 수 있다.
useCallback을 사용하여 렌더링 시 불필요한 함수 생성 막기
앞에서 이미 코드의 구조를 분석했기에, 먼저 코드적으로 접근을 해보고자 한다.
그 전에 useCallback은 언제 사용하는지 알아보자.
useCallback이란?
useCallback은 함수를 메모이제이션하는 훅이다.
메모이제이션은 이전에 계산한 값을 저장함으로써, 같은 계산을 반복하지 않도록 하는 것이다.
>useCallback은 함수를 메모이제이션하여, 렌더링 시마다 새로운 함수를 생성하지 않도록 한다.
이렇게만 놓고 보면 이게 왜 필요한가 싶을 수 있다.
이를 위해서 이해해야 하는 개념이 "함수 동등성"이다.
함수 동등성
자바스크립트에서 함수는 객체로 취급된다. 그렇기에 함수는 참조값을 가진다.
두 객체가 같은 값을 가져도, 메모리 주소가 다르면 다른 객체로 취급되는 것처럼,
함수도 같은 로직을 갖고 있어도 메모리 주소가 다르면 다른 함수로 취급된다.
- 함수 동등성 예시
- 결과
const a = () => console.log("Hello");
const b = () => console.log("Hello");

console.log(a === b);

특정 함수를 다른 함수의 인자로 넘기거나, 자식 컴포넌트의 props로 넘길 때, 함수의 참조가 달라서 예상하지 못하는 문제가 생길 수 있다.
<!DOCTYPE html>
<html lang="ko">
  <head>
    <meta charset="UTF-8" />
    <title>함수 참조 동등성 문제 예시</title>
  </head>
  <body>
    <button id="myButton">클릭하세요</button>

    <script>
      const button = document.getElementById("myButton");

      // 이벤트 핸들러 함수 정의
      function handleClick() {
        console.log("버튼이 클릭되었습니다.");
      }

      // 이벤트 리스너 추가
      button.addEventListener("click", handleClick);

      // 나중에 이벤트 리스너를 제거하려고 시도 (문제 발생)
      button.removeEventListener("click", () => {
        console.log("버튼이 클릭되었습니다.");
      });

      // 설명을 위해 버튼을 클릭해보자.
      // 콘솔에는 여전히 '버튼이 클릭되었습니다.'가 출력된다.
    </script>
  </body>
</html>
위 코드에서 함수 동등성으로 인해서 발생하는 문제를 확인할 수 있다.
useCallback은 이러한 문제를 해결하기 위해 사용된다.
코드에 useCallback 적용하기
App.tsx에서 login, logout, addNotification, removeNotification 함수가 존재한다.
이 함수들은 useAppContext에서 사용되고 있으며, 이 함수들은 App 컴포넌트가 렌더링 될 때마다 새로운 함수를 생성한다.
이를 방지하기 위해서 useCallback을 사용하여 함수를 메모이제이션할 수 있다.
- App.tsx의 수정 전
- App.tsx의 수정 후
const toggleTheme = useCallback(() => {
  setTheme((prevTheme) => (prevTheme === "light" ? "dark" : "light"));
}, []);

const addItems = useCallback(() => {
  setItems((prevItems) => [
    ...prevItems,
    ...generateItems(1000, prevItems.length),
  ]);
}, []);

const login = useCallback((email: string) => {
  setUser({ id: 1, name: "홍길동", email });
  addNotification("성공적으로 로그인되었습니다", "success");
}, []);

const logout = useCallback(() => {
  setUser(null);
  addNotification("로그아웃되었습니다", "info");
}, []);

const addNotification = useCallback(
  (message: string, type: Notification["type"]) => {
    const newNotification: Notification = {
      id: Date.now(),
      message,
      type,
    };
    setNotifications((prev) => [...prev, newNotification]);
  },
  []
);

const removeNotification = useCallback((id: number) => {
  setNotifications((prev) =>
    prev.filter((notification) => notification.id !== id)
  );
}, []);
const toggleTheme = useCallback(() => {
  setTheme((prevTheme) => (prevTheme === "light" ? "dark" : "light"));
}, []);

const addItems = useCallback(() => {
  setItems((prevItems) => [
    ...prevItems,
    ...generateItems(1000, prevItems.length),
  ]);
}, []);

const addNotification = useCallback(
  (message: string, type: Notification["type"]) => {
    const newNotification: Notification = {
      id: Date.now(),
      message,
      type,
    };
    setNotifications((prev) => [...prev, newNotification]);
  },
  []
);

const removeNotification = useCallback((id: number) => {
  setNotifications((prev) =>
    prev.filter((notification) => notification.id !== id)
  );
}, []);

const login = useCallback(
  (email: string) => {
    setUser({ id: 1, name: "홍길동", email });
    addNotification("성공적으로 로그인되었습니다", "success");
  },
  [addNotification]
);

const logout = useCallback(() => {
  setUser(null);
  addNotification("로그아웃되었습니다", "info");
}, [addNotification]);
이때에, login, logout 함수는 addNotification 함수를 사용하고 있기에, addNotification 함수를 의존성 배열에 추가해주어야 한다.
반환값 최적화
useMemo는 함수가 반환하는 값을 메모이제이션하는 훅이다.
함수에 대한 최적화를 했으니, 이제 useMemo를 이용해서 함수들이 반환하는 값에 대한 최적화를 할 차례이다.
보통 useMemo는 계산량이 많은 함수나, 렌더링 시마다 계산이 필요한 값에 사용된다.
이를 기준 삼아서, 연산이 복잡한데, 불필요하게 매번 계산되는 값들을 useMemo를 사용하여 최적화해보자.
App.tsx에 useMemo 적용하기
App.tsx에서는 contextValue를 제공한다.
컨텍스트 값 객체는 매 렌더링 시마다 새 객체로 생성되므로, useMemo를 사용하여 최적화할 수 있다.
- App.tsx의 수정 전
- App.tsx의 수정 후
const contextValue: AppContextType = {
  theme,
  toggleTheme,
  user,
  login,
  logout,
  notifications,
  addNotification,
  removeNotification,
};
const contextValue: AppContextType = useMemo(
  () => ({
    theme,
    toggleTheme,
    user,
    login,
    logout,
    notifications,
    addNotification,
    removeNotification,
  }),
  [
    theme,
    toggleTheme,
    user,
    login,
    logout,
    notifications,
    addNotification,
    removeNotification,
  ]
);
ItemList.tsx에 useMemo 적용하기
ItemList 컴포넌트에서 filteredItems, totalPrice, averagePrice 값들이 존재한�다.
이 값들은 렌더링 시마다 계산되는 값이기에, useMemo를 사용하여 최적화할 수 있다.
- ItemList.tsx의 수정 전
- ItemList.tsx의 수정 후
const filteredItems = items.filter(
  (item) =>
    item.name.toLowerCase().includes(filter.toLowerCase()) ||
    item.category.toLowerCase().includes(filter.toLowerCase())
);

const totalPrice = filteredItems.reduce((sum, item) => sum + item.price, 0);

const averagePrice = Math.round(totalPrice / filteredItems.length) || 0;
const filteredItems = useMemo(
  () =>
    items.filter(
      (item) =>
        item.name.toLowerCase().includes(filter.toLowerCase()) ||
        item.category.toLowerCase().includes(filter.toLowerCase())
    ),
  [items, filter]
);

const totalPrice = useMemo(
  () => filteredItems.reduce((sum, item) => sum + item.price, 0),
  [filteredItems]
);

const averagePrice = useMemo(
  () => Math.round(totalPrice / filteredItems.length) || 0,
  [totalPrice, filteredItems.length]
);
React.memo 적용하기
React.memo는 함수형 컴포넌트를 메모이제이션하여 불필요한 리렌더링을 방지하는 고차 컴포넌트(HOC)이다.
컴포넌트가 동일한 props로 다시 렌더링될 때, 이전에 렌더링된 결과를 재사용하여 성능을 최적화할 수 있다.
특히, 컴포넌트가 무거운 연산을 수행하거나, 자주 리렌더링될 가능성이 있는 경우에 유용하다.
적용 방법은 간단하다. 함수형 컴포넌트를 React.memo로 감싸주기만 하면 된다.
export const Header: React.FC = React.memo(() => {
  renderLog("Header rendered");
  const { theme, toggleTheme, user, login, logout } = useAppContext();

  const handleLogin = () => {
    // 실제 애플리케이션에서는 사용자 입력을 받아야 합니다.
    login("user@example.com", "password");
  };

  return (
    <header className="bg-gray-800 text-white p-4">
      <div className="container mx-auto flex justify-between items-center">
        <h1 className="text-2xl font-bold">샘플 애플리케이션</h1>
        <div className="flex items-center">
          <button
            onClick={toggleTheme}
            className="bg-blue-500 hover:bg-blue-700 text-white font-bold py-2 px-4 rounded mr-2"
          >
            {theme === "light" ? "다크 모드" : "라이트 모드"}
          </button>
          {user ? (
            <div className="flex items-center">
              <span className="mr-2">{user.name}님 환영합니다!</span>
              <button
                onClick={logout}
                className="bg-red-500 hover:bg-red-700 text-white font-bold py-2 px-4 rounded"
              >
                로그아웃
              </button>
            </div>
          ) : (
            <button
              onClick={handleLogin}
              className="bg-green-500 hover:bg-green-700 text-white font-bold py-2 px-4 rounded"
            >
              로그인
            </button>
          )}
        </div>
      </div>
    </header>
  );
});
위와 같이 감싸주기만 하면 된�다.
App.tsx는 루트이므로, 이를 제외하고 감싸준다.
렌더링 최적화
함수와 값에 대한 최적화를 했으니, 이제 React.memo 사용과 컴포넌트 구조 수정을 통해 렌더링 최적화를 진행한다.
리액트 개발자 도구 탐구에서 배운 리액트 개발자 도구를 활용한다.
개발자 도구를 통해 파악한 추가 문제
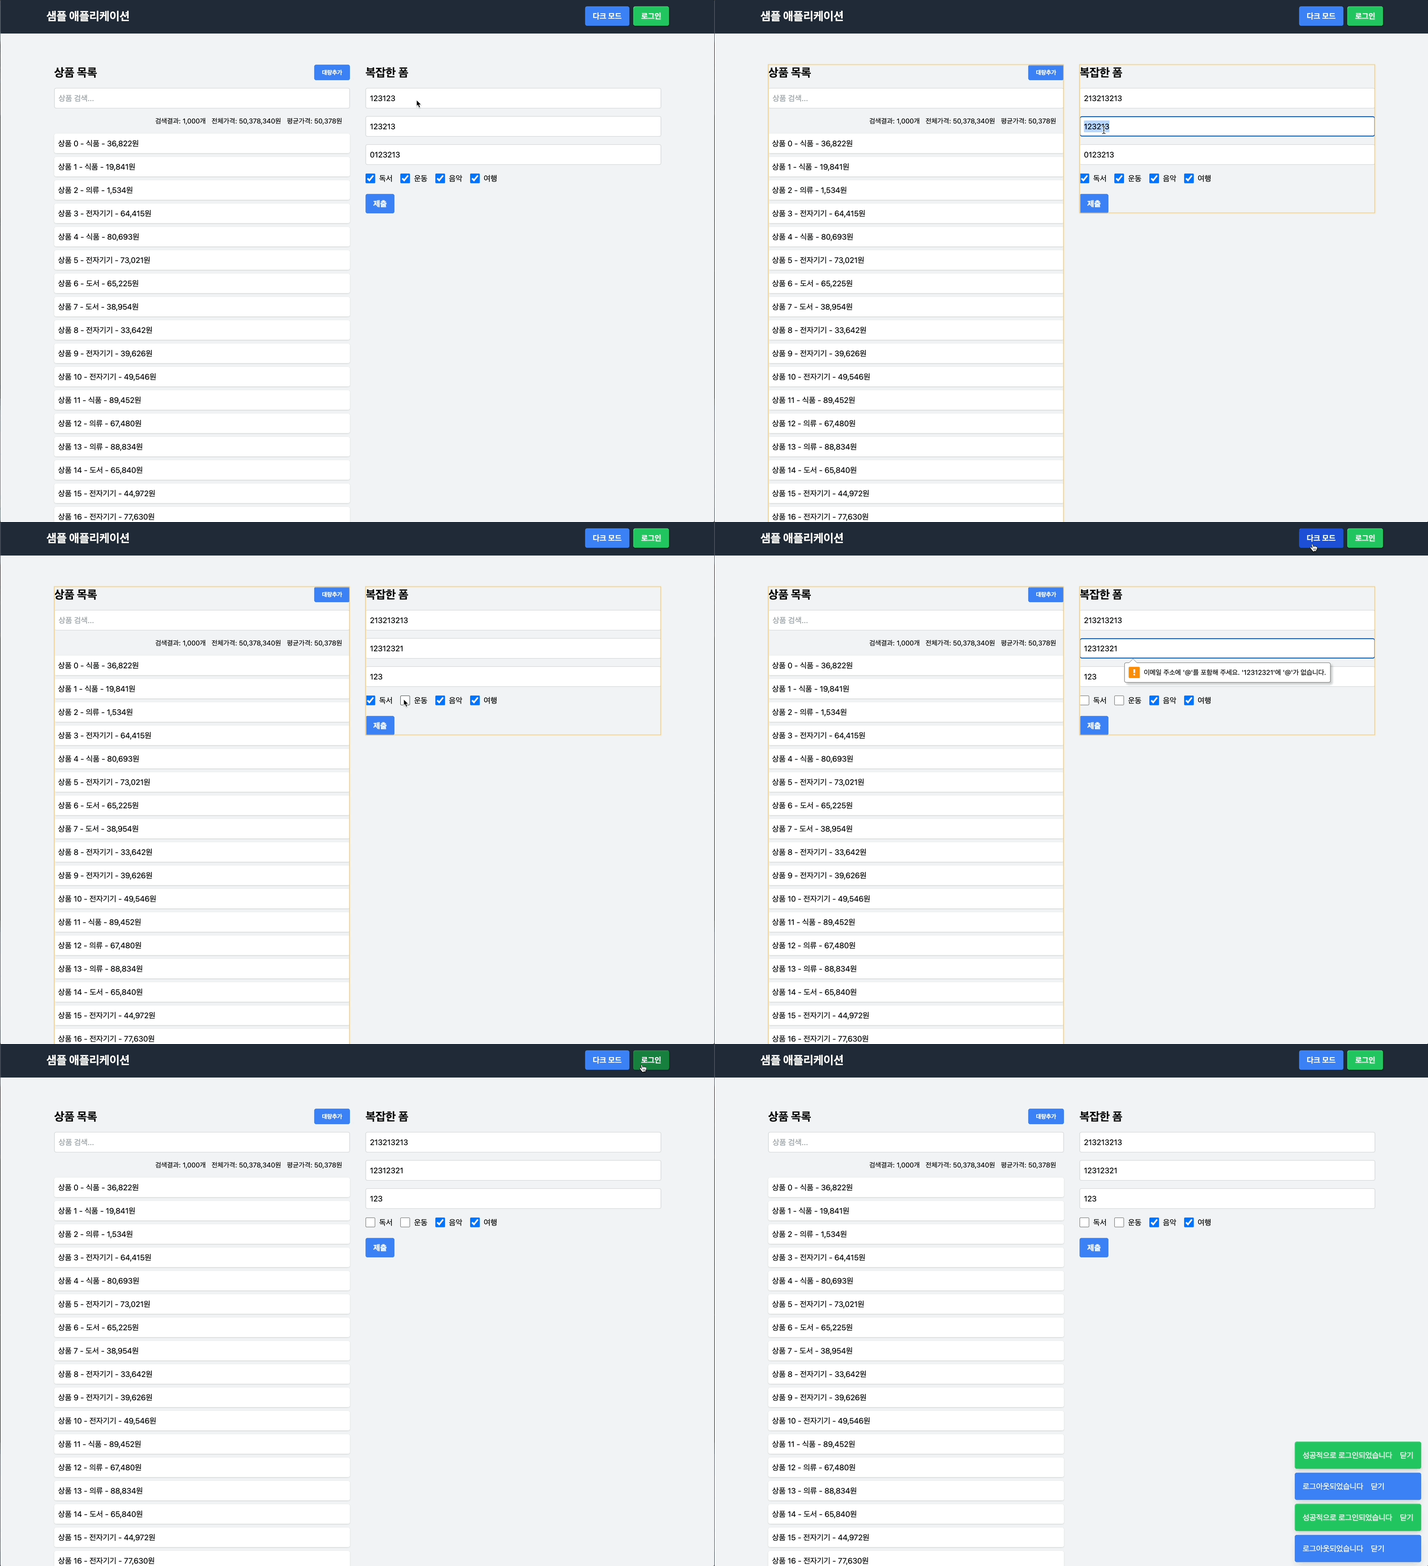
어떤 이벤트가 트리거되면 화면의 모든 컴포넌트가 렌더링이 되는 문제가 발생하고 있다.
Context에 기반한 문제 파악
현재 구조에서 전체 리렌더링이 일어나는 가장 큰 이유는 AppContext에 모든 상태와 함수가 하나의 컨텍�스트로 제공되고 있기 때문이다.
컨텍스트의 값이 변경될 때마다 모든 컨텍스트 소비자(Comsumer)가 리렌더링 된다.
이는 리액트의 Context API의 기본 동작 때문으로, 컨텍스트 값이 변경될 때 해당 컨텍스트를 구독하고 있는 모든 컴포넌트가 리렌더링 되는 방식 때문이다.
이로 인해 테마 변경이나 사용자 인증 상태 변경 시 불필요한 컴포넌트 리렌더링이 발생한다.
Context 분리
이를 해결하기 위해서는 AppContext를 여러 개의 컨텍스트로 분리하여, 컨텍스트 값이 변경될 때마다 해당 컨텍스트를 구독하고 있는 컴포넌트만 리렌더링 되도록 해야 한다.
AppContext를 분리하기 위해서 ThemeContext, UserContext, NotificationContext로 나누자.
contexts 폴더를 만들어서, 이들을 각각 모듈화한다.
- 분리된 ThemeContext
- 분리된 UserContext
- 분리된 NotificationContext
interface ThemeContextType {
  theme: string;
  toggleTheme: () => void;
}

const ThemeContext = createContext<ThemeContextType | undefined>(undefined);

export const ThemeProvider: React.FC<{ children: ReactNode }> = ({
  children,
}) => {
  const [theme, setTheme] = useState("light");

  const toggleTheme = useCallback(() => {
    setTheme((prevTheme) => (prevTheme === "light" ? "dark" : "light"));
  }, []);

  return (
    <ThemeContext.Provider value={{ theme, toggleTheme }}>
      {children}
    </ThemeContext.Provider>
  );
};

export const useTheme = (): ThemeContextType => {
  const context = useContext(ThemeContext);
  if (context === undefined) {
    throw new Error("useTheme must be used within a ThemeProvider");
  }
  return context;
};
interface UserContextType {
  user: User | null;
  login: (email: string, password: string) => void;
  logout: () => void;
}

const UserContext = createContext<UserContextType | undefined>(undefined);

export const UserProvider: React.FC<{ children: ReactNode }> = ({
  children,
}) => {
  const [user, setUser] = useState<User | null>(null);

  const login = useCallback((email: string, password: string) => {
    setUser({ id: 1, name: "홍길동", email });
  }, []);

  const logout = useCallback(() => {
    setUser(null);
  }, []);

  return (
    <UserContext.Provider value={{ user, login, logout }}>
      {children}
    </UserContext.Provider>
  );
};

// 커스텀 훅
export const useUser = (): UserContextType => {
  const context = useContext(UserContext);
  if (context === undefined) {
    throw new Error("useUser must be used within a UserProvider");
  }
  return context;
};
interface NotificationContextType {
  notifications: Notification[];
  addNotification: (message: string, type: NotificationType) => void;
  removeNotification: (id: number) => void;
}

const NotificationContext = createContext<NotificationContextType | undefined>(
  undefined
);

export const NotificationProvider: React.FC<{ children: ReactNode }> = ({
  children,
}) => {
  const [notifications, setNotifications] = useState<Notification[]>([]);

  const addNotification = useCallback(
    (message: string, type: NotificationType) => {
      const newNotification: Notification = {
        id: Date.now(),
        message,
        type,
      };
      setNotifications((prev) => [...prev, newNotification]);
    },
    []
  );

  const removeNotification = useCallback((id: number) => {
    setNotifications((prev) =>
      prev.filter((notification) => notification.id !== id)
    );
  }, []);

  return (
    <NotificationContext.Provider
      value={{ notifications, addNotification, removeNotification }}
    >
      {children}
    </NotificationContext.Provider>
  );
};

// 커스텀 훅
export const useNotification = (): NotificationContextType => {
  const context = useContext(NotificationContext);
  if (context === undefined) {
    throw new Error(
      "useNotification must be used within a NotificationProvider"
    );
  }
  return context;
};
가독성��을 이유로 하나의 파일에 작성했지만, 실제로는 각각 다른 파일로 분리하였다.
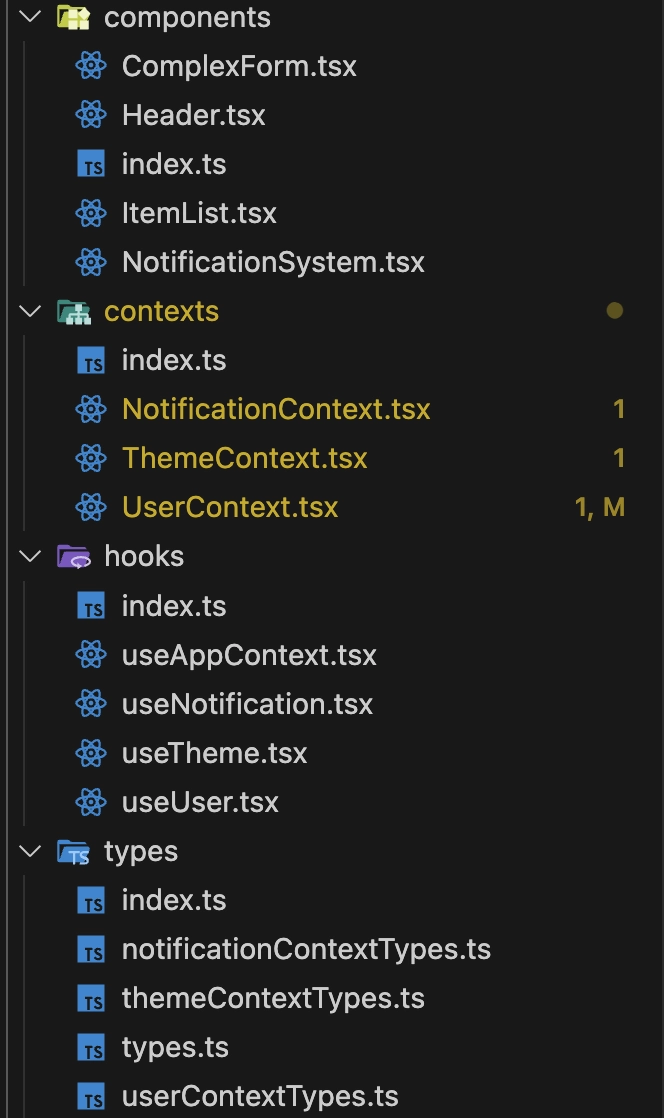
이후 분리한 컨텍스트를 각 컴포넌트에 적용하면 된다.
결과
- 최적화 전
- 최적화 후

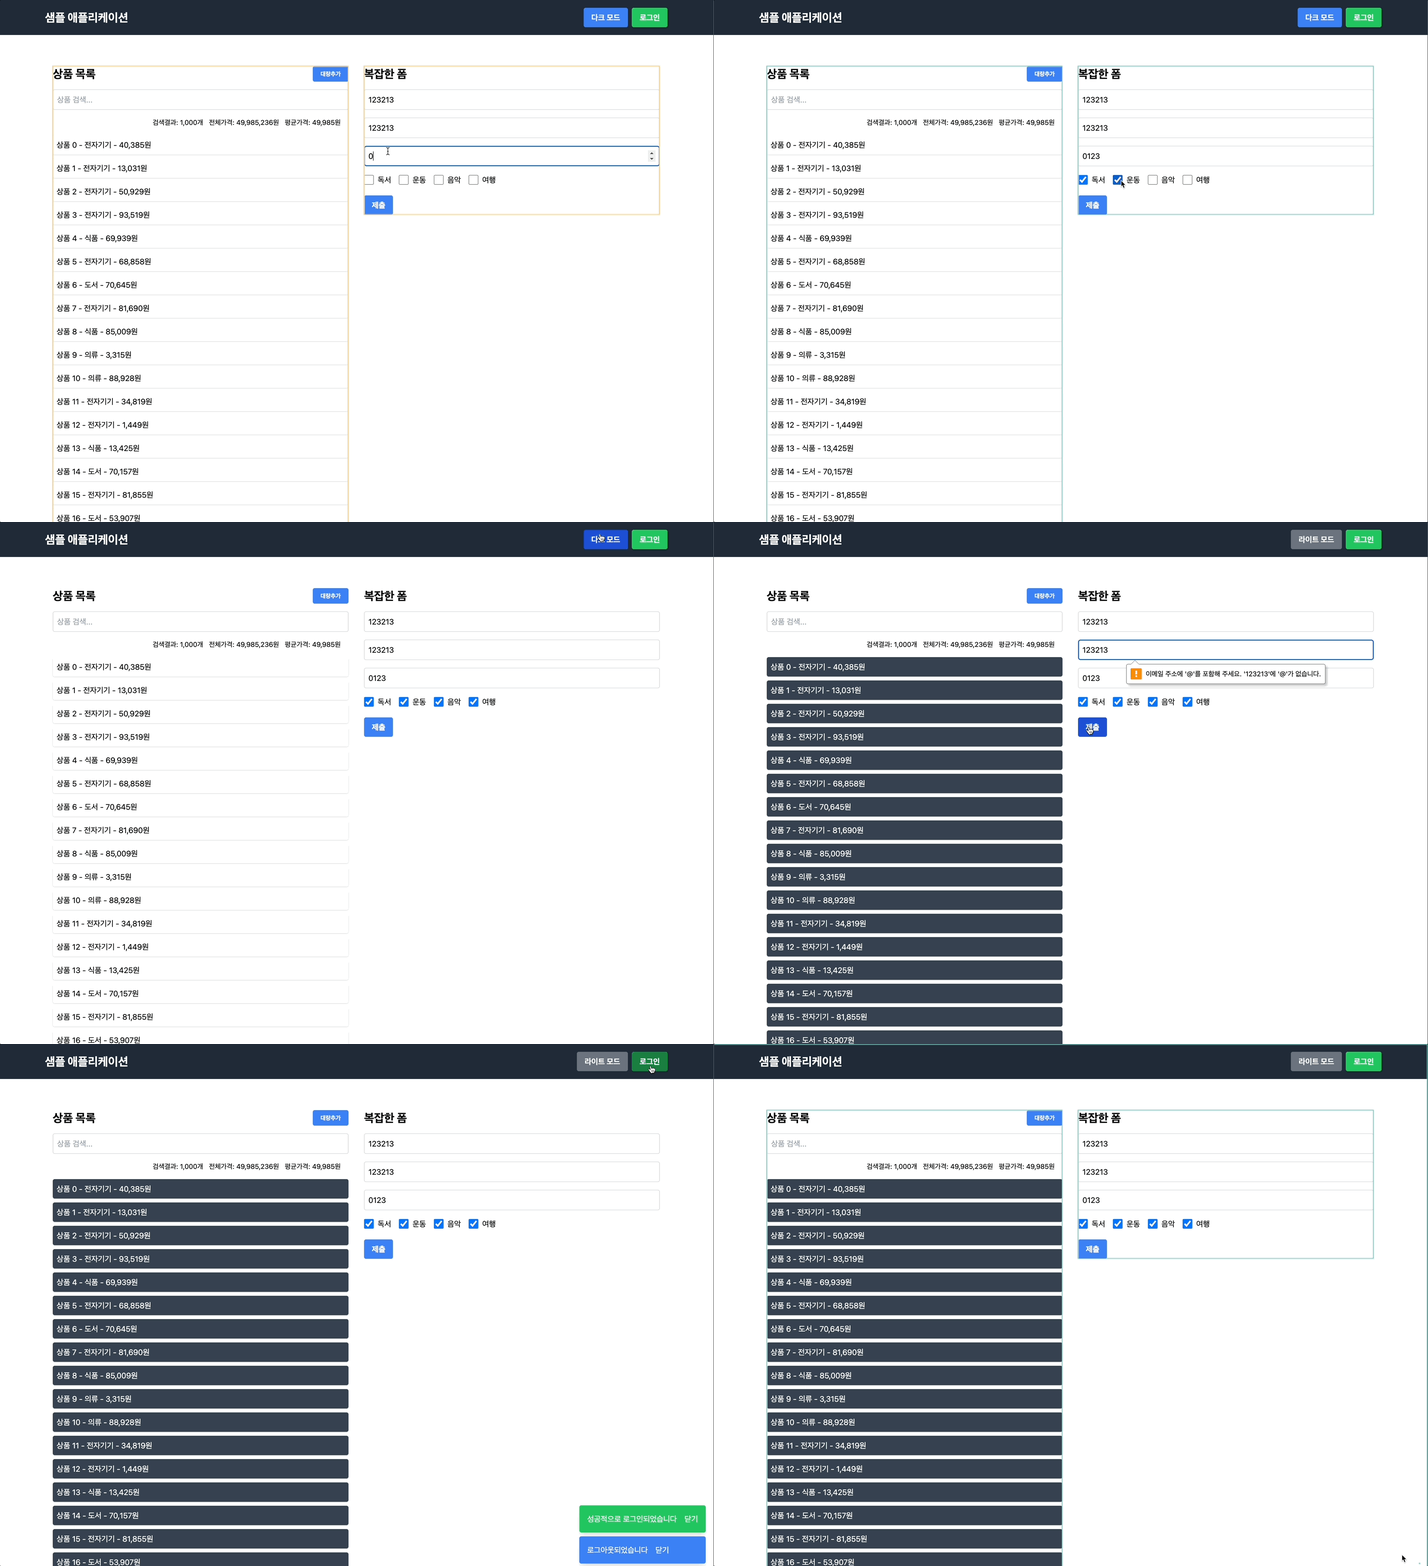
최적화를 진행한 결과, 리렌더링이 줄어들었음을 확인할 수 있다.
렌더링에서 큰 차이가 없어 보이지만, 사실 컨테이너만 리렌더링이 될 뿐 전반적인 렌더링 자체가 확 줄었다.
모두 다 렌더링이 되던게, 부분적으로 렌더링이 되고 있다.
- 기존 성능 측정
- 최적화 후 성능 측정


성능 측정 자체는 다크모드 / 라이트모드 전환을 기준으로 했다.
오른쪽 패널에서 확인해볼 수 있듯, 최적화 후에 Render duration이 21.8ms 에서 11.6ms로 준 것을 볼 수 있다.
고찰
교육을 받으면서도 배운 것이지만, 사실 useCallback, useMemo, React.memo로 인한 최적화는 간단한 코드인 경우에는 효과가 미미할 수 있다고 한다.
실제로, 이번 결과에서도 차이가 굉장히 미미한 것을 볼 수 있다.
어떤 기능을 실행시키느냐에 따라서, 오히려 간단한 기능임에도 추가로 실행시켜야 하는 모듈이 많아 렌더링 시간이 더 걸리기도 했다.
최적화는 필요한 곳에만 하는 것이 좋다.
useCallback,useMemo,React.memo는 잘 쓰면 성능이 개선되지만, 잘 못쓰면 성능이 저하될 수 있다.
이 말의 의미를 잘 몰랐는데.. 이번에 직접 해보면서 느끼게 된 것 같다.
- 기존 성능 측정
- 최적화 후 성능 측정


이건 로그인 버튼을 눌렀을 때인데, 오히려 최적화 후의 성능이 더 안 좋아진 것을 볼 수 있다.
마무리 : 앞으로 어떻게 할 것인가?
이번에 제대로 써보면서 배웠으니, 앞으로는 '언제' 최적화를 해야 하는지에 대해 고민해가고자 한다.
최적화 기법에 대한 공부도 이어나가야겠지만, 무엇보다도 언제 최적화를 해야 하는지에 대한 판단이 중요하다고 생각되어서, 이런 훈련을 꾸준히 이어가고자 한다.
정리
useCallback,useMemo,React.memo를 사용하면 리액트 렌더링에 있어서 최적화를 할 수 있다.- 단, 이것들을 사용할 때에는 언제 사용해야 하는지에 대한 판단이 중요하다.